A Complete Beginner-Friendly Guide to Building Interactive AI Apps with Streamlit

Large Language Models (LLMs) continue to advance at an incredible pace, but without a good user interface, even the most powerful model is difficult for people to use. Streamlit solves this gap by allowing you to turn Python scripts into clean, interactive, shareable web apps with minimal code.
This Part 1 guide will walk you through the fundamentals of Streamlit, show you how to build your first LLM-powered interface, and teach you how to manage user input, model responses, and session state. By the end, you’ll have a working web-based chatbot and a strong understanding of the Streamlit workflow.
What You Will Learn
By completing this guide, you will be able to:
Understand how Streamlit structures web apps
Build a simple interactive UI using Streamlit components
Connect a real LLM API (such as Gemini) to your frontend
Handle user input and dynamic app updates
Use st.session_state to maintain memory across reruns
This is the foundation you’ll need before moving to more advanced agent interfaces and production-level dashboards.
Section 1: Environment Setup
Before writing any code, let’s set up everything you need.
Required Tools
Python 3.12+
Streamlit
An LLM API client such as Gemini
dotenv for securely loading API keys
Install the libraries
pip install streamlit gemini python-dotenv
Store your API key
Create a .env file:
GEMINI_API_KEY=your-api-key-here
Then load it in code:
# config.py
import os
from dotenv import load_dotenv

load_dotenv()
GEMINI_API_KEY = os.getenv("GEMINI_API_KEY")
This ensures your API key is not hardcoded into your main application file.
Section 2: Streamlit Fundamentals
Streamlit runs a script top to bottom every time a user interacts with the UI.
Let’s break down the essential elements you’ll use in nearly every app.
1. st.title() - Create a Page Title
import streamlit as st

st.title("LLM Chat Assistant")
Run it:
streamlit run app.py

You’ll see a clean web page at:
http://localhost:8501
2. st.text_input() - Capture User Input
prompt = st.text_input("Enter your question or prompt:")
3. st.button() - Trigger Actions
if st.button("Generate Response"):
    st.write("Processing your prompt...")
4. st.markdown() - Rich Text Display
st.markdown("**LLM Response:** This will appear bold.")

5. st.sidebar - Add a Side Panel
with st.sidebar:
    st.markdown("## Settings")
    model = st.selectbox("Choose Model", ["gemini-1.0", "gemini-2.0"])

6. st.session_state - Persistent Memory
Streamlit re-runs your whole script every time widgets update.
To persist anything such as chat history:
if "history" not in st.session_state:
    st.session_state["history"] = []
7. User Feedback with st.success(), st.error(), st.warning()
st.success("Response generated!")
st.error("Something went wrong.")
st.warning("Please check your input.")
Full Code Block for Section 2
import streamlit as st

st.title("LLM Chat Assistant")

prompt = st.text_input("Enter your question or prompt:")

if st.button("Generate Response"):
    st.write("Processing your prompt...")

st.markdown("**LLM Response:** This will appear bold.")

with st.sidebar:
    st.markdown("## Settings")
    model = st.selectbox("Choose Model", ["gemini-1.0", "gemini-2.0"])

if "history" not in st.session_state:
    st.session_state["history"] = []

st.session_state["history"].append("User prompt")

st.success("LLM response generated successfully!")
st.error("It just a fake error")
st.warning("Please pay attention to the warning")
Section 3: Integrating an LLM Into Streamlit
Step 1: Create an LLM Request Function
We’ll add error handling so the app never crashes:
import os
from dotenv import load_dotenv
import streamlit as st
from gemini import GeminiClient

load_dotenv()
api_key = os.getenv("GEMINI_API_KEY")

if not api_key:
    raise ValueError("Missing GEMINI_API_KEY in .env file.")

client = GeminiClient(api_key=api_key)

def ask_llm(prompt, model="gemini-1.0"):
    try:
        response = client.chat_completion(
            model=model,
            messages=[{"role": "user", "content": prompt}],
            temperature=0.7,
            max_tokens=200
        )
        return response["choices"][0]["message"]["content"].strip()
    except Exception as e:
        return f"Error: {str(e)}"
Step 2: Use the Function in Streamlit
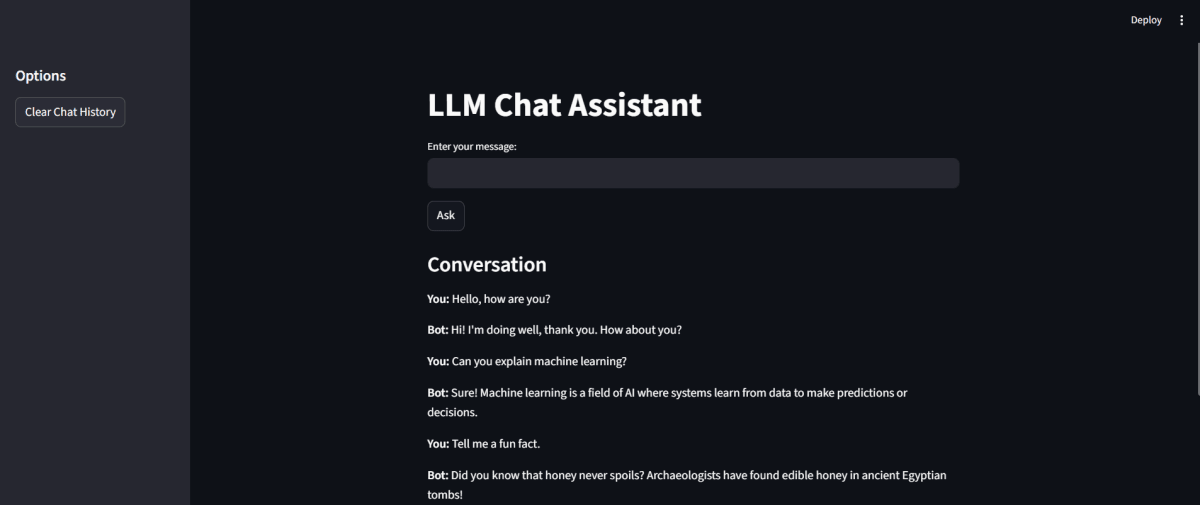
st.title("LLM Chatbot")

prompt = st.text_input("Enter your message:")

if st.button("Ask"):
    if prompt.strip() == "":
        st.warning("Please enter a prompt.")
    else:
        with st.spinner("Waiting for the LLM response..."):
            response = ask_llm(prompt)
        if response.startswith("Error"):
            st.error(response)
        else:
            st.success("Response received:")
            st.markdown(response)
Section 4: Making the App Stateful with st.session_state
Step 1: Initialize History
if "history" not in st.session_state:
    st.session_state["history"] = []
Step 2: Save Each Turn
st.session_state["history"].append({"user": prompt, "bot": response})
Step 3: Show Past Messages
for chat in st.session_state["history"]:
    st.markdown(f"**You:** {chat['user']}")
    st.markdown(f"**Bot:** {chat['bot']}")
Step 4: Add Reset Button
with st.sidebar:
    if st.button("Clear Chat History"):
        st.session_state["history"] = []
Clean and Polished Final App
import streamlit as st
import os
from dotenv import load_dotenv
from gemini import GeminiClient

# Load API key
load_dotenv()
GEMINI_API_KEY = os.getenv("GEMINI_API_KEY")
client = GeminiClient(api_key=GEMINI_API_KEY)

# LLM function
def ask_llm(prompt, model="gemini-1.0"):
    try:
        response = client.chat_completion(
            model=model,
            messages=[{"role": "user", "content": prompt}],
            temperature=0.7,
            max_tokens=200
        )
        return response["choices"][0]["message"]["content"].strip()
    except Exception as e:
        return f"Error: {str(e)}"

# Title
st.title("LLM Chatbot")

# Initialize state
if "history" not in st.session_state:
    st.session_state["history"] = []

# Sidebar
with st.sidebar:
    st.markdown("## Options")
    if st.button("Clear Chat History"):
        st.session_state["history"] = []
        st.success("Chat cleared.")

# User input
prompt = st.text_input("Enter your message:")

# Ask button
if st.button("Ask"):
    if not prompt.strip():
        st.warning("Please enter a prompt.")
    else:
        with st.spinner("Waiting for the LLM response..."):
            response = ask_llm(prompt)
        if response.startswith("Error"):
            st.error(response)
        else:
            st.session_state["history"].append({
                "user": prompt,
                "bot": response
            })
            st.success("Response received!")

# History display
if st.session_state["history"]:
    st.markdown("### Conversation")
    for chat in st.session_state["history"]:
        st.markdown(f"**You:** {chat['user']}")
        st.markdown(f"**Bot:** {chat['bot']}")

# Debug
with st.expander("Show session state (debug mode)"):
    st.json(st.session_state["history"])

Summary of What You Built
By the end of Part 1, you built:
A fully interactive Streamlit web app
A working LLM-powered chatbot using Gemini models
Real-time response handling with loading indicators
Conversation memory using st.session_state
Configurable sidebar options
Clean, modular code ready to extend
This sets the perfect foundation for Part 2, where you can explore:
Multi-agent workflows
File uploads
Visual output components
Advanced UI patterns
Caching and performance optimization
Join the conversation
Sign in to share your thoughts and engage with other readers.
No comments yet
Be the first to share your thoughts!